티스토리 뷰
3rd - jQuery를 이용한 HTML DOM 접근(기본 셀렉터 두 번째 이야기)
원하는 개체를 쉽고 편하게 선택하자 - 셀렉터
|
셀렉터의 종류 |
셀렉터 표현 방법 |
|
All Selector |
$("*") |
|
ID Selector |
$("#id") |
|
Element Selector |
$("elementName") |
|
Class Selector |
$(".className") |
|
Multiple Selector |
$("selector1, selector2, selector3, selectorN") |
지난 시간에 이어 기본이 되는 셀렉터의 나머지 부분인 클래스와 여러가지 셀렉터를 조합하여 요소에 접근하고, 개체를 탐색 선택하는 방법에 대한 이야기를 진행 하도록 하겠습니다.
Class Selector : $(“.class”)
자바스크립트의 getElementByClassName()과 동일한 역할을 하고 있는 셀렉터 입니다.
getElementByClassName() 메서드의 경우 몇몇 브라우저에서 지원을 하고 있지 않기 때문에 크로스브라우징을 지원해야 하는 개발이라면 올바르게 동작하지 않는 문제가 발생할 수 있습니다.
IE8 이하 버전에서는 지원을 하고 있지 않다고 하며, IE9과 HTML의 차세대 버전인 HTML5에서는 기본적으로 지원을 한다고 합니다.
프런트 부분을 개발하다 보면 위와 같은 문제로 인하여, 많은 개발자가 고민하고 해결책을 찾다가 많은 시간을 허비하는 경우가 상당합니다. 문제를 찾기위해 자바스크립트 디버깅을 해 보지만 상당한 노가다를 필요로 하는 경우도 많을 뿐더러 브라우저마다 에러를 내는 형식이 다르기 때문에 상당한 골치 덩어리 입니다.
여기서 다시 한번 jQuery의 강점인 크로스브라우징에 대한 강조를,,, jQuery의 ClassSelector의 경우 현존하는 대부분의 브라우저에서 사용이 가능하오니, 위와 같은 문제를 미연에 방지 할 수 있으며 이러한 문제에 대해 고민을 할 필요 조차 없게 됩니다.
다시 본론으로 들어가서 Class Selector에 대해 알아 보기로 하겠습니다.
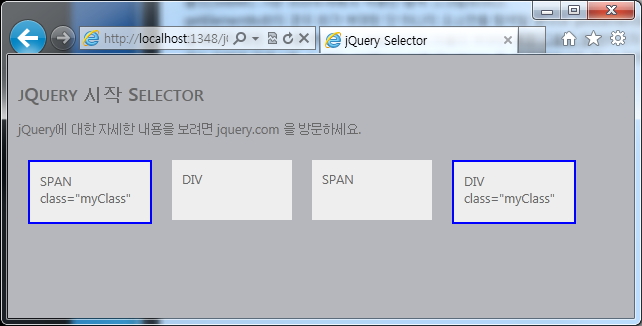
다음은 문서(HTML)내의 클래스명이 myClass인 요소를 모두 찾아 테두리의 색상을 변경하는 예제입니다.
<html xmlns="http://www.w3.org/1999/xhtml">
<head>
    <title>jQuery Selector</title>
    <link href="../Styles/Site.css" rel="stylesheet" type="text/css" />
    <style>
        div,span {
            width:100px; height:40px; float:left; padding:10px; margin:10px;
            background-color:#EEEEEE;
        }
    </style>
    <script src="http://code.jquery.com/jquery-latest.js"></script>
    <script type="text/javascript">
        $(document).ready(function () {
            //Class가 myClass인 요소를 찾아 테두리를 "blue"로 변경합니다.
            $(".myClass").css("border", "2px solid blue");
        });
    </script>
</head>
<body style="padding:10px;">
    <h2>jQuery 시작 Selector</h2>
    <p>jQuery에 대한 자세한 내용을 보려면 jquery.com 을 방문하세요.</p>
    <span class="myClass">SPAN class="myClass"</span>
    <div>DIV</div>
    <span>SPAN</span>
    <div class="myClass">DIV class="myClass"</div>
</body>
</html>

Multiple, Complex Selector :
$(“selector1, selector2, selectorN”)
$(“#id div.class”)
앞서 설명한 셀렉터의 나열이나 조합을 통하여 개발자가 원하는 개체를 보다 쉽고 정확하고 빠르게 탐색 할 수 있습니다.
셀렉터를 “,” 통하여 나열할 경우 각각의 셀렉터를 통해 탐색된 개체의 집합을 반환하며, 셀렉터의 조합을 통하여 탐색을 했을 경우 각 셀렉터의 교집합 조건의 개체가 탐색되어 반환 됩니다.
$(“#content”, “div”, “a”, “.myclass”) 경우 ID의 값이 “content”인 개체, “div”, “a” 태그를 가지는 개체, 클래스 명이 “myClass”인 개체를 탐색하여 반환을 하게 되는 반면 $(“div.myClass”)의 경우 “div” 태그로 구성되었으며 동시에 클래스 명이 “myClass”인 개체를 반환합니다.
다음 두가지 예제를 통해 두 가지 셀렉터의 동작과 차이점을 알아 보도록 하겠습니다.
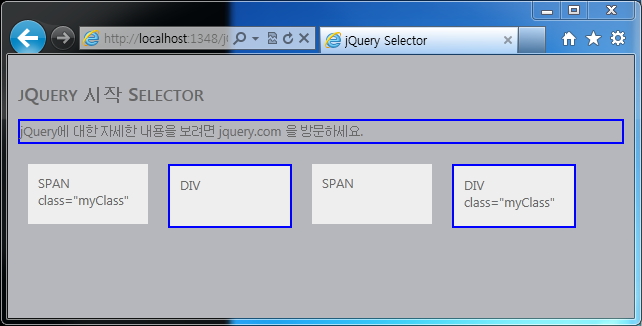
첫 번째 예제 : ID값이 Conetnt이며 DIV 요소를 찾아 테두리를 파랑색으로 변경합니다.
<html xmlns="http://www.w3.org/1999/xhtml">
<head>
    <title>jQuery Selector</title>
    <link href="../Styles/Site.css" rel="stylesheet" type="text/css" />
    <style>
        div,span
        {
            width:100px;
            height:40px;
            float:left;
            padding:10px;
            margin:10px;
            background-color:#EEEEEE;
        }
    </style>
    <script src="http://code.jquery.com/jquery-latest.js"></script>
    <script type="text/javascript">
        $(document).ready(function () {
            //id=content, div 요소를 찾아 테두리를 "blue"로 변경합니다.
            $("#content, div").css("border", "2px solid blue");
        });
    </script>
</head>
<body style="padding:10px;">
    <h2>jQuery 시작 Selector</h2>
    <p id="content">jQuery에 대한 자세한 내용을 보려면 jquery.com 을 방문하세요.</p>
    <span class="myClass">SPAN class="myClass"</span>
    <div>DIV</div>
    <span>SPAN</span>
    <div class="myClass">DIV class="myClass"</div>
</body>
</html>

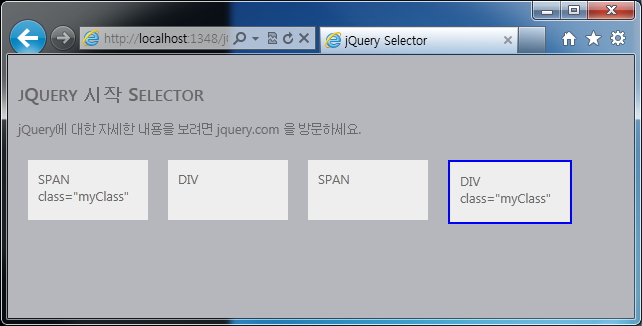
두 번째 예제 : DIV 요소중에 클래스명이 myClass인 요소를 찾아 테두리를 파랑색으로 변경합니다.
<html xmlns="http://www.w3.org/1999/xhtml">
<head>
    <title>jQuery Selector</title>
    <link href="../Styles/Site.css" rel="stylesheet" type="text/css" />
    <style>
        div,span
        {
            width:100px;
            height:40px;
            float:left;
            padding:10px;
            margin:10px;
            background-color:#EEEEEE;
        }
    </style>
    <script src="http://code.jquery.com/jquery-latest.js"></script>
    <script type="text/javascript">
        $(document).ready(function () {
            //div 요소 중 class가 myclass인 개체를 찾아 테두리를 "blue"로 변경합니다.
            $("div.myClass").css("border", "2px solid blue");
        });
    </script>
</head>
<body style="padding:10px;">
    <h2>jQuery 시작 Selector</h2>
    <p id="content">jQuery에 대한 자세한 내용을 보려면 jquery.com 을 방문하세요.</p>
    <span class="myClass">SPAN class="myClass"</span>
    <div>DIV</div>
    <span>SPAN</span>
    <div class="myClass">DIV class="myClass"</div>
</body>
</html>

이번 시간에는 jQuery의 셀렉터의 기본적인 내용을 알아 보았습니다.
셀렉터는 jQuery에서 가장 많이 사용하는 부분이며, 동적인 웹 개발에 필수적인 항목이므로 반듯이 이해해야 하는 부분입니다.
다음 강좌에서는 요소의 속성(Attribute)을 통해 요소(개체)에 접근하는 방법에 대해 알아 보기로 하겠습니다.
from. http://www.sqler.com/382519
- Total
- Today
- Yesterday
- Filter
- Oracle
- asp
- select
- jquery
- 비행기
- centOS
- 항공편
- dom
- 실시간
- focus
- If
- Click
- Drop
- attr
- javascript
- 인천공항
- Selector
- event
- ready
- regexp
- create
- 기초
- Next
- html
- android
- 제이쿼리
- jsp
- submit
- MySQL
| 일 | 월 | 화 | 수 | 목 | 금 | 토 |
|---|---|---|---|---|---|---|
| 1 | ||||||
| 2 | 3 | 4 | 5 | 6 | 7 | 8 |
| 9 | 10 | 11 | 12 | 13 | 14 | 15 |
| 16 | 17 | 18 | 19 | 20 | 21 | 22 |
| 23 | 24 | 25 | 26 | 27 | 28 | 29 |
| 30 |
